Logic Audio for MacOS
About the Environment
Logic Audio's Environment window is probably the most misunderstood aspect of the program. Initially, the concept can seem very different to users who have come from other sequencing applications that take an alternative approach to MIDI hardware setup and processing.
Put simply, the Environment window allows you to set up a "flowchart" of your connected MIDI equipment and to include additional processing tools, such as arpeggiators, faders, pan pots and more. These additional tools are collectively known as "objects" in the Environment.
The primary function of the Environment is to get data into and out of Logic Audio. Needless to say, it can do a great deal more than this.
The key word and concept to keep in mind when dealing with the Environment is "flowchart". The Environment allows you to clearly define how you want your MIDI data flow to be sent to and from your physical MIDI devices. Further to this, you can set up software "objects", such as onscreen faders to access virtually any parameter of your physical MIDI devices.
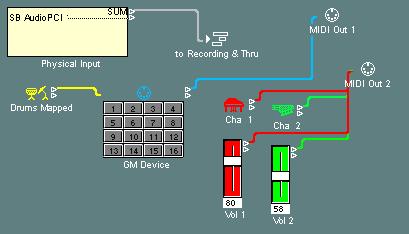
This diagram shows a number of "objects" connected to one another in the Environment. If you plan out your connections and follow a "logical" path through, you will find using the Environment a breeze.
The way the Environment is traditionally used is that an individual "layer" is created for each MIDI device in your setup.
These layers access your various MIDI instruments and devices, patch lists and also the processing objects mentioned above. The Environment can be as simple or complex as you need (or want) it to be, dependent on your use of Logic Audio.
Building an Environment from the Ground Up
To help you understand how the Environment works on a basic level, follow this simple "step by step" guide. Here, you will learn how to completely set up your MIDI and audio inputs and outputs, plus define onscreen "Instruments", which represent your real-world MIDI devices.
First, create a new Song and trash its Environment:
- Create a new Song by selecting "New" from Logic's File menu.
- Open an Environment window by selecting "Open Environment" from the Windows menu.
- Select the "All Objects" Layer from the Layers pop-up menu.
- Select all the objects on this Layer by choosing "Select All" from the Environment window's Edit menu.
- Delete all objects by selecting "Clear" from the Edit menu.
- Save this Song. Give it a name like "Blank Song", or similar.
Second, create & cable the input objects:
- Select the "Clicks & Ports" Layer from the Layers menu.
- Select "Physical Input" from the Environment window's New menu.
- Select "Sequencer Input" from the Environment window's New menu.
- Click & hold on the "SUM" outlet of the PHYSICAL INPUT object and drag a cable to the SEQUENCER INPUT object.
Third, create a list of your studio's MIDI devices:
- Make a list all the MIDI devices that are connected to MIDI output ports of your MIDI interface.
- For each device on the list, indicate whether it receives on one or several MIDI channels.
- For each sound-producing device on the list, indicate
whether it is multi-tonal. (Multi-tonal means that different
notes make different sounds rather than making the same sound
at different pitches. Drum, percussion and sound effects
modules are examples of multi-tonal synths.
N.B. - For GM synths, which have several preset GM drum kits, you should simply view these as "multichannel" synths, as per the above point. Handling of their multi-tonal presets (i.e. drum kits) is covered below.
Fourth, create an INSTRUMENT for each MIDI device on your list:
- Go to the Layer named "MIDI Instr." by selecting it from the Layers menu.
- For the devices that receive on only one MIDI channel but are not "multi-tonal", create a standard INSTRUMENT by choosing "Instrument" from the Environment window's New menu.
- For the devices that receive on more than one MIDI channel, create a MULTI-INSTRUMENT by choosing "Multi-Instrument" from the New menu:
- For the multi-tonal devices, create a MAPPED INSTRUMENT by choosing "Mapped Instrument" from the New menu.
Fifth, set the port and channel parameters for each of the INSTRUMENTS you've created:
- Set the port and channel of each standard INSTRUMENT using the "Cha" parameter in its Parameter Box.
- Set the port of each MULTI-INSTRUMENT using the "Cha" parameter in the global Parameter Box &emdash; i.e. the one for the whole MULTI-INSTRUMENT not one of it's sub-instruments.
- Set the port and "base" channel for each MAPPED INSTRUMENT using the "Cha" parameter in its Parameter Box. (You can change the channel and cable for individual notes in the MAPPED INSTRUMENT'S window &emdash; accessible by simply double-clicking on the MAPPED INSTRUMENT object.)
Sixth, set up the Arrange window's Track List:
- Within the Environment window, select each of the INSTRUMENTS that you created (all 3 types) and choose a name and icon for it in its Parameter Box. (For MULTI-INSTRUMENTS, ensure that you use the global Parameter Box and not one of the sub-instrument's Parameter Boxes.)
- If you wish, a color can be applied to each object by choosing "Object Colors" from the View menu. The color applies to both the Environment window object and the Arrange window's Track list.
- Remove each of the MULTI-INSTRUMENTS you created from the Arrange window's Track list by unchecking its "Icon" checkbox in the global Parameter Box.
- For each MULTI-INSTRUMENT sub-instrument that you want on the Track list's Instrument menu, click the sub-instrument number in the MULTI-INSTRUMENT and check its "Icon" checkbox.
Seventh, create the AUDIO OBJECTS to match your setup.
- Go to the Environment Layer named "Audio" by selecting it from the Layers menu.
- Create an AUDIO OBJECT for each playback channel of your HD recording system.
- Set the audio device, audio track and MIDI channel for each AUDIO OBJECT. (The MIDI channel determines what incoming MIDI messages will affect the AUDIO OBJECT'S settings.)
Congratulations!
At this point, you've created a working Environment for MIDI and
Audio sequencing with Logic.
SAVE IT NOW!
Further Changes You Can Make to your Environment
As you work with this basic Environment, you will probably discover (through reading the manual and experimentation) that there are several further modifications that could enhance your workflow. Some of these are discussed below, but we recommend that you familiarize yourself with Logic Audio for at least a week or so before further customizations are made.
If you've created MULTI-INSTRUMENTS they will have the default names in all their name banks &emdash; either the standard GM names or just numbers. If you are using MacOS, you can use any text editor to copy and paste banks of names into MULTI-INSTRUMENTS. If you have Sound Surfer or Sound Diver, you can use Autolink to automatically update these name banks. As a last resort, you can type names in by hand....but before you do, many MULTI-INSTRUMENTS with their bank names already filled in (usually just the factory pre-sets) can be downloaded from the Internet or are found on your Logic Audio CD-ROM. See below for more info about ready made environments.
If you've created MAPPED INSTRUMENT they will have the standard GM drum note names in them. You may eventually want the names of your multi-tonal sounds for the notes. The only way to do this is to enter each one by hand.
If you have a MULTI-INSTRUMENT which has one channel (usually channel #10) devoted to drum presets, you may want to use a MAPPED INSTRUMENT for this channel. The easiest way to do this is to create a MAPPED INSTRUMENT and cable it IN to the MULTI-INSTRUMENT. Make sure you click "Remove" when Logic asks so that the MAPPED INSTRUMENT is no longer connected directly to a port (since the MULTI-INSTRUMENT still is). This is the "flowchart" in practice...with signal flowing through the MULTI-INSTRUMENT from the MAPPED INSTRUMENT.
If you want to select programs by name for the standard INSTRUMENTS you've created, there are two options. One is to replace the standard INSTRUMENT with a MULTI-INSTRUMENT and use its sub-instrument for the channel corresponding to the standard INSTRUMENT'S channel. The other option is to create a MULTI-INSTRUMENT with the program names in it and cable the standard INSTRUMENT into it. As with the MAPPED INSTRUMENT above, click "Remove" when Logic asks.
For each INSTRUMENT, MAPPED INSTRUMENT and sub-instrument of a MULTI-INSTRUMENT the "Prg", "Vol" and "Pan" checkboxes in its Parameter Box are initially unchecked. If you want these INSTRUMENTS to have initial program, volume and pan settings, you should check these boxes and enter the desired values. You may also want to set some of the other INSTRUMENT parameters.
If you started with Logic's default Song, the Arrange window will now have lots of "No Output" Tracks. You can eliminate these by choosing "Delete Unused" from the Structure menu's Track sub-menu.
If you'd like to create an altogether more complex environment, here's some good news for you...
Ready-Made Environments
Many existing synthesizers and MIDI devices have already had environments built for them by other Logic Audio users and by Emagic themselves. Some are to be found on the Logic Audio program CD-ROM and further environments can be found at http://www.swiftkick.com/lugec.html
This site also features a number of freely downloadable "basics" docs on the Environment and an excellent and comprehensive Environment Guide which is available for purchase.
Use the "import layer" function in the Environment's Options menu to get these "ready-to-wear" environments into your autoload. You can also use other "import" functions to use particular portions/aspects of any pre-existing environment...please refer to the reference manual for further information on this.
Once you've got things set up right...i.e. have a working autoload...do the following three things.
- Save it.
- Copy the autoload to another folder (or two) on your computer as a safety measure.
- Secondly, every time you create a new song, give it a new name (NOT autoload) and save it...THEN start sequencing.
And now an important tip....
Even if your synth/module is not specifically listed among the
online or CD "freebies", look for an environment of it's closest
relative or an environment of a similar device from another
manufacturer.
As examples - the Roland MC505 and MC303, Korg's X5DR and Yamaha's
MU-series. While these devices are not EXACTLY the same, you'll
find that most of the patch names, mixer settings, bank select
messages etc. are pretty close.
There generally WILL be differences, but you may only need to change a handful of parameters/names etc. to make any of these environments perfect for your device/s.
These pre-existing environments can be very useful as a reference source. Just follow the flowchart to see how someone else has configured their environment and replicate (or copy/paste) it.
![]()
Copyright © 2001 Emagic Soft- und Hardware GmbH, info@emagic.de
![]()