Logic Audio for MacOS
Setup | Interface | Workarounds | Function Names | Shortcuts
The User Interface
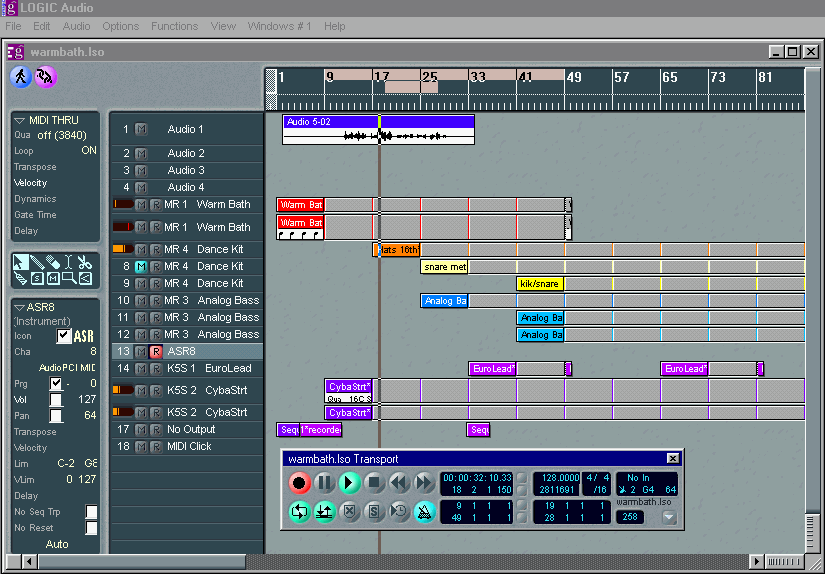
The Arrange Window is Logic Audio's primary working window. It is divided into three basic "areas" - from left to right, these are the Parameters, the Track List and the Arrange area. Above the Arrange area, you'll find the Bar/Beat Ruler, sometimes referred to as the Timeline. While reading the information in this section, you'll learn how these various areas interact with each other and will also discover how similar the handling of both MIDI and audio regions is in Logic Audio.

Figure 1 &emdash; The Arrange Window showing a number of sequence objects and an audio region. Note the floating Transport bar, over the lower portion of the Arrange area. &emdash; Click to Enlarge.
The Parameters Area
There are three "boxes" in the parameters area. They are, from top to bottom, the Sequence/Audio Object parameters, the Tool Box and the Track/Instrument parameters.
Sequence/Audio Object Parameters

Figure 2 &emdash; The Object Parameters Box
This parameter box (Figure 2) is directly related to the sequence objects and audio regions which appear as colored rectangles in the arrange area to the right of (Figure 1). When any object, either MIDI or audio region data, is selected by clicking ONCE on it with the mouse, this parameter box will update to reflect the parameters assigned to that particular object.
Each object in the Arrange area may have its own parameter settings, allowing independent transposition, quantization and more. The parameters for MIDI sequence objects and audio regions are different.
Some Tips for working with Logic Audio's Parameters
- In the Sequence Parameters box, the transpose & delay functions have a couple of "zones" to the right of the text where you can click your mouse. If you click to the extreme right of the box, you will be able to increment/decrement values in individual steps. If you click the mouse in about a centimeter or two from the right hand edge of the parameter box, a flip menu of mathematical variables will show up &emdash; 1/8th, 1/16th a.s.o. &emdash; allowing you to select one, if appropriate to the task at hand.
- Double-clicking on almost all numerical values in any parameter box, editor, on the transport bar etc. will allow you to directly type in a value. This method of direct numerical entry can be used for quantize, program changes, FX parameters etc. which will accelerate your workflow. To do this, double-click on the numerical values within the various parameter fields and use your computer keyboard to type in a new value, followed by the Enter key. You will also find that direct numerical entry works on many graphical elements in Logic Audio. Such objects that don't appear to have a direct numerical entry possibility, including pan pots, faders etc. in the Environment, can be interacted with in this fashion.
It should be noted that all of the Object parameters are available as real-time processes, meaning that changing these parameter values can occur while Logic Audio is running.
The Tool Box
![]()
Figure 3 &emdash; The Toolbox
Key to selecting and altering MIDI and audio information in the Arrange Window and Logic Audio's other editing windows, is the Toolbox (Figure 3).
This contains a pointer, pencil, eraser, scissors & glue tools plus others which allow you to select, draw, cut, copy, paste, delete, merge and crossfade (audio regions only) sequence and/or audio objects.
The toolbox is context-sensitive and additional (or fewer) tools will appear for particular tasks in the various individual edit windows.
Tip: When you need to use any of the tools, hit the "ESC" key on your computer's keyboard and the Toolbox will "float" at the spot your mouse pointer currently occupies onscreen. When the floating toolbox appears, simply select the appropriate tool with your mouse cursor.
The Track/Instrument Parameters

Figure 4 &emdash; Track/Instrument Parameters Box
This set of parameters (Figure 4) is linked to the second onscreen area - the Track List - and sets global parameters such as the selection of instruments (Prg - Program Change), the overall track volume, transposition and more for ALL objects on the track. A "track" is an object/collection of objects in the arrange area which are aligned horizontally with a particular track name.
This parameter box will update each time a new track is selected in the Track List.
The Track List

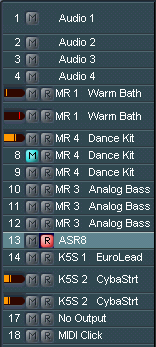
Figure 5 &emdash; The Track List
The second column from the left is known as the Track List (Figure 5).
This is where you can add, delete, select, name and reorganize the tracks/instruments used in your song.
- Note the red "R" on the ASR8 track. This track is "armed" for recording and any MIDI input received by Logic, when the record button is depressed on the Transport bar, will be recorded to this track. This recording will then appear as a sequence object in the arrange area.
- The blue "M" on track 8 - the second "MR 4 Dance Kit" - indicates that all objects on the track are muted - i.e. all objects aligned horizontally on this track are silent.
- The orange and red indicators to the left of tracks 5, 6, 7, 15 and 16 are level meters. These are useful aids for keeping an eye on what tracks contain objects that are currently playing and their relative levels.
- Record arming and muting/unmuting of audio or MIDI tracks is achieved by clicking on the R or M buttons for each track in the Track List. Once armed, pressing the record button on the Transport Bar will start recording audio or MIDI data to the selected track.
Reorganizing Your Tracks
You may want to reorganize your tracks to keep things neat onscreen or to group particular instruments together, which can be useful for scoring. To do this:
- move your mouse pointer over the NUMBER on the track you wish to move which will change the appearance of the cursor to a "hand" icon (Figure 6)

Figure 6
- Click and hold the mouse button and drag the track up or down the Track List to the desired location, then release the mouse button. This will both change your track order, and also move all of the associated Track objects in the Arrange area.
Resizing Tracks/Objects
This function allows you to independently resize individual tracks/objects, which may be useful for a number of musical situations. As an example, zooming in on an audio drum loop region to obtain a visual reference of "hit points" in the waveform overview. This enhanced visual cue may aid you in getting your sequenced parts perfectly aligned with various downbeats in the audio region.
To independently resize a track/sequence or audio object;
- move your mouse pointer to the LEFT of the NUMBER on the track you wish to resize which will change the appearance of the cursor to the "Finger" icon (Figure 7)

Figure 7
- Click and hold the mouse button and drag up or down the track list until the required zoom level is attained, then release the mouse button.
The Arrange Area

Figure 8 &emdash; Arrange Window
This is where your audio regions and MIDI objects are "arranged" into a song. In this area, you can freely drag and drop your objects from position to position, make aliases, loops, copies and more.
Audio and MIDI data can be recorded directly into the Arrange area as mentioned earlier in the Track List section. You can even add audio regions - in either WAV or AIF format - directly to the Arrange area by drag and dropping them from any folder on your hard disk.
HyperDraw
Further to these facilities, you can also adjust the volume, pan and other controller settings of EACH sequence object or audio region within the Arrange window using the HyperDraw function.
The HyperDraw allows you to visually insert a set of points, which are automatically connected by the function as a segmented line, shown below.

Figure 9 &emdash; HyperDraw on an Audio Region
As a tip, HyperDraw is easiest to use when an object is zoomed. Use the resizing method described earlier.
To use Hyperdraw:
- Select the sequence object or audio region you wish to alter
- Open the View>HyperDraw menu
- Select the type of controller
- This will change the selected region's visual appearance to a blue background.
- Click directly in the region with the mouse at points you would like to insert the specified controller.
The Bar/Beat Ruler
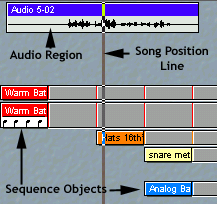
Within the Arrange window, you can also visually refer to your current song position via the Song Position Line (SPL) and the Bar/Beat Ruler. (Figure 10)
![]()
Figure 10 &emdash; The Bar/Beat Ruler
The LEFT & RIGHT Locators in the Transport bar and in the Bar/Beat Ruler at the top of the Arrange window allow you to set cycle region boundaries to facilitate cycling over a part. You can do this by clicking and dragging from left to right directly in the Bar/Beat Ruler with the mouse. Any changes made directly to the cycle region start & end points in the Bar/Beat Ruler or to the Locator values in the Transport Bar will be reflected in the other.
The Transport Bar
The Transport Bar is used to "transport" you to different points in the music. The buttons - Play, Rewind, Pause, Fast Forward etc., work as per those on a CD player. We'll allow you to explore the uses of the cycle, drop etc. Buttons on your own.
The record button, to the top left of the Transport Bar, is used for recording both MIDI and audio data on any currently ARMED track, which is selected in the Track List. It is also possible to simultaneously record MIDI and audio tracks in Logic Audio . To do so, press the SHIFT key while clicking on multiple tracks in the Track List.
Figure 11 &emdash; The Transport Bar &emdash; Click to Enlarge.
- The sync button accesses synchronization options for both audio and MIDI plus tempo operations. Spend a little time exploring the options found in this menu, particularly if you are interested in locking Logic Audio to video, film or digital devices with word-clock synchronization facilities.
- The S.M.P.T.E./Bar Position area indicates the current bar number occupied by the Song Position Line. In Figure 11 above, the display shows 1 1 1 1, which means: first bar, first beat, first 16th and first clock pulse. The time position, 00:00:00 etc. means - 0 hours, 0 minutes, 0 seconds, 0 milliseconds/frames. and so on.
- The lower two sets of numbers, from top to bottom, are the LEFT and RIGHT Locators, which are used for setting cycle region points, as discussed in the Bar/Beat Ruler section.
- The Tempo and (Time) Signature display indicates the tempo accurate to 1/10,000 of a Beat Per Minute.
- The /16 below the Time Signature of 4/ 4 indicates the Bar or display resolution, so that any edits you may perform on your MIDI or audio data can be carried out with more precision. The /16 refers to the number of divisions in the bar. Click and hold your mouse button, and drag up or down to change this value.
- Beneath the tempo, you will notice the number 2809579. This indicates the maximum number of MIDI events that it would be possible to record on this particular computer.
- The MIDI Activity display shows all MIDI input & output and also serves as a "Panic" button. If you have hung notes you can click once in the MIDI Activity Window to send a MIDI reset message to your specified "system" channel, or double-click to send a Full Panic Reset which systematically works through all MIDI channels & ports and resets all connected MIDI devices.
- The Song End box displays the bar number at which the song will end and sets a maximum song length. By default this is set to 201 bars.
- Clicking on the downwards pointing arrow beside the Song End box will open a menu of Transport Bar display options, which will allow you to customize the appearance of the Transport bar to meet your requirements. We suggest that you select "Legend" which will turn on the function titles, as shown in Figure 11 above, while using Logic Audio.
The Menu Bars
The Main Menu Bar is where all basic file operations, such as save, open etc. occur. From the various Menu Items you can access additional system parameters, open windows, access help and will find many data processing options.
Logic Audio's menuing system is context-sensitive and local menus will update to reflect the functions available to the currently active edit window.
As an example, when in the Score Edit window, the Local Menu Bar will update to display options which are relevant to notation only, such as "Enharmonic Shift" or "Stems Up/Down". Naturally, choices such as these would have little place in the Event List editor as you can't see note stems, nor enharmonically shift a list of numbers & letters.
Zoom Controls
The Zoom Controls step though several levels of magnification. The "zoom bars" to the lower right of each window are used for horizontal & vertical zooming.
Clicking on the large end of the zoom bars - i.e. the end with the widely spaced lines - will enlarge your view. The narrow end of the bar will reduce the size of objects displayed in the Arrange area, allowing you to see a wider range of your song.
Further to the User Interface are the:
Editor Windows and the Audio Mixer.
![]()
Copyright © 2001 Emagic Soft- und Hardware GmbH, info@emagic.de
![]()
